INF633 - Advanced 3D Graphics (2022 - 2023)
| Github Repository | Github Page | Moodle |
- First steps
- Starting our project
- Session 01 - Terrain Edition
- Session 02 - Object Placement
- Session 03 - Character Animation
- Session 04 - Crowds and Evolution
- Interesting Links
First Steps
Introduction
Welcome to the official page for the lab sessions of INF633 for the course 2022-2023!
The goal of this project is to create, starting from a flat empty terrain, one with interesting features, objects and dynamic, living creatures all interacting together. For this, multiple edition tools will be created and basic principles of animation and crowd simulation used to give life to the virtual world.
In this page, you will find the same introduction to install and setup Unity that you can find also in the README.md of the repository at https://github.com/edualvarado/inf633-2022-2023, and also the description and content for each lab session.
Installing Unity
Link to download: https://unity.com/download
- Download Unity Hub. It’s a explorer tool for your projects where you can have simultaneously different Unity builds.
- Create an Unity account: It will be required when you launch the program. You can select the free option for personal use.
- Choose your Unity build. For this lab, we will be using 2021.3.8f1 LTS
- Make sure you have a text editor installed and configured for C#. Visual Studio Code is a popular option, but you can use any other code editor or IDE.
- Now you should be able to open Unity. Make sure that you can successfully launch it, that your graphics drivers are working or that you do not have any particular problem.
First Setup in Unity
Before even importing the lab project, let’s have a general overview of Unity. First, we first need to associate Unity with our chosen C# editor.
- In Unity, go to
Edit > Preferences > External Tools - Change
External Script Editorto your preferred text editor. - Make sure that your text editor is configured to handle C#.
- From now on, when you are writing your scripts, self-completion for the Unity API among other tools will be enable while you program your scripts in Unity.
Unity Interface and Controls
Unity uses a modular window system. That means, that each part of the interface can be reorganized and placed as you like. By default, Unity will show a similar appearance to this one:
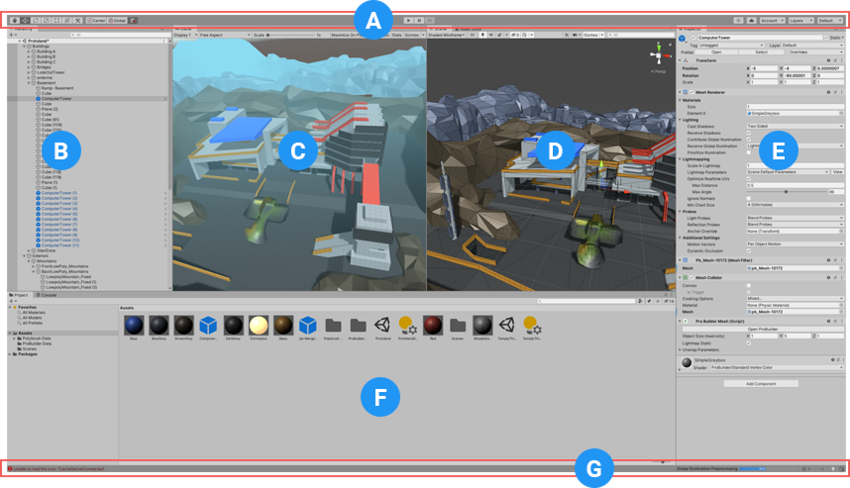
- A - Top bar. Here you can find some common tools such as Move, Rotate or Scale. Also, you can find the Play button to start your application, or Pause button, to stop it in the current frame. When it is paused, the Step button is available to go to the next frame.
- B - Hierarchy. Here are all the elements in your Scene. Those elements (commonly named as Game Objects in Unity) can be anything: 3D models, cameras, illumination… On top of that, you find the Scene. A
Sceneis the parent element that serves as a environment where you place all your Game Object. - C - Scene view. This window is the editor where you edit all your Game Objects before clicking Play in the normal Unity workflow.
- D - Game view. This window shows the rendered, running application when you click in Play. It will show whatever Display you have decided to show. Each of these displays is associated to a Camera Game Object. Keep in mind that you could still interact with the Game view during the Play mode by scripting, as you might do in any game.
- E - Inspector. One of the most important parts. Each Game Object has an Inspector associated that describes it. These descriptions are based on Components (for example, a Transform Component would describe the position, rotation and scale of the Game Object which has been associated to). You can attach the built-in components that Unity brings, or your own scripts in C#.
- F - Project. Here you can find all your assets of Unity, such as your 3D models, scripts, textures, materials…
- G - Console. The last line provided by the console, that displays errors, warnings or any other message that you have programmed to show during run-time. Next to the Project window, you can find the Console window where the entire space is dedicated to debugging.
3D Controls
In the Scene view:
- Left click to select a Game Object.
- Right click to rotate the camera on itself.
- Right click + WASD to move the camera in the environment.
- Middle click to pan the camera.
- Scroll wheel to zoom in/out.
- F to focus the camera on the selected Game Object.
- Alt + Left click to rate the camera around the focus point.
Interface and Interaction
Some fast tips regarding the overall workflow in Unity:
- If you have errors in your scripts, they will show up in red in the bottom left corner. Otherwise, you can use the Console window.
- Any variable that you set as
publicwill be visible in the interface and editable in real-time. Although during this lab we will not focus on the code syntax and efficiency, normally it is a good practice to declared the variable asprivateand serialized it to make it visible in the Unity inspector using[SerializeField].
Starting our project
Opening the project
- Clone this repository.
- Make sure you have Unity Hub and an Unity built installed (as we describe in Introduction)
- In Unity Hub, click in
Open > Add project from disk - Select the parent folder of the repository, containing the Unity project. You will differentiate it because it contains folders such as
AssetsorPackages. - Open the project by selecting the installed built of Unity. That’s all!
Running the scene
- To run the project, just click on the Play button at the top menu. The windows will be colored when the project is running.
- For the lab session project:
- Add new brushes before running the project, by selecting the terrain and drag-and-dropping the script in its inspector.
- Select the terrain and click on the Use button of one of the brushes
- You can then paint on the terrain (in the game view) with your brush.
- Click the Play button again to stop. Changes will be saved.
SESSION 01 - Terrain edition
Getting started
In this session, you will be designing and implementing brushes, allowing you to dynamically edit the terrain. Your brushes will extend the base class TerrainBrush and control terrain modifications in a restricted area around the mouse, by implementing the method draw.
The base code for this session can be found in the following file, and shows how to set all cells in the current region to a defined height.
public class SimpleBrush : TerrainBrush {

    public float height = 5;

    public override void draw(int x, int z) {
        for (int zi = -radius; zi <= radius; zi++) {
            for (int xi = -radius; xi <= radius; xi++) {
                terrain.set(x + xi, z + zi, height);
            }
        }
    }
Code Snippet 1: "Scripts/01Terrain Brushes/SimpleBrush.cs"
Copy this file to use it as a base for your own brushes, by changing the name of the copied file and class name.
Brush ideas
- Simple brush (square shape - already done!)
- Flat brush (to fix terrain always to “0”)
- Incremental increase/decrease
- Gaussian increase/decrease
- Smooth/healing brush
- Random brush
- Different brush shapes (square, circle, etc)
- Volume-preserving brush (move matter around instead of removing/adding it)
- Erosion brush (simulates water droplets falling in the region, eroding the terrain)
- Coherent noise brush (Perlin Noise or other approach, using Mathf.PerlinNoise or your own implementation)
Examples
Useful functions and variables
// Get or set the height of the terrain at (x, z)
  float terrain.get(int x, int z);
  void terrain.set(int x, int z, float height);
  // Get the terrain normal at (x, z)
  Vector3 terrain.getNormal(float x, float z);

  // Get the terrain size
  Vector3 terrain.gridSize();

  // Reset the whole terrain to height=0
  void terrain.reset();

  // Print to the Unity console (next to game tab)
  print("message");
  // Print to game viewport (top left)
  terrain.debug.text = "message";
Code Snippet 2: Useful functions
  // Access the underlying terrain
  CustomTerrain terrain;

  // Radius of the brush
  int radius;
  int terrain.brush_radius;
Code Snippet 3: Useful variables
SESSION 02 - Object Placement
Getting started
In this second session, you will design brushes that place objects on the terrain. Here it will be trees, but you can search for or provide other objects.
The base code for this session shows how to instantiate one object where the user clicked, and four at the corners of the drawing region. Note that these types of brushes extend the InstanceBrush class instead of the TerrainBrush one used in the previous session.
public class SimpleInstanceBrush : InstanceBrush {

    public override void draw(float x, float z) {
        spawnObject(x, z);
        spawnObject(x - radius, z - radius);
        spawnObject(x - radius, z + radius);
        spawnObject(x + radius, z - radius);
        spawnObject(x + radius, z + radius);
    }
}
Code Snippet 4: "Scripts/02\_Instance Brushes/SimpleInstanceBrush.cs"
Like in the previous session, you can use this file as a base for your own brushes by copying it and changing the file and class names.
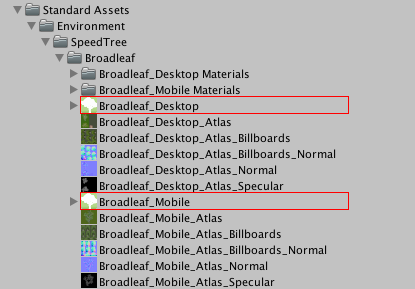
You can set the object that will be instantiated by drag-and-dropping a model in the Object_prefab parameter of the terrain at run-time. A few models of trees are already in the project, in 04 - Terrain Assets > Environment > Trees and then the file with a tree icon in one of the three sub-folders.
To remove objects, you can use the default tools provided in the original terrain editor by Unity. For this, select the terrain and go to the terrain > Paint trees
tab (in the inspector). You can then shift-click on the terrain to remove objects around your cursor. Note that this works outside of play mode in the Scene view (not in the Game view!), as opposed to the brushes you implement.
Brush ideas
- Random placement in a square
- Random placement in a circle
- Placement on an grid, optionally rotated (crops)
- Placement in small clusters of objects (bushes, groves)
- Minimal distance brush, that makes sure that every placed object has
> xfree space - Terrain-related placement:
- Prevent placement if the terrain is too steep (using a threshold angle)
- Prevent placement depending on the altitude
h - You can try to create arrays of elements, and place them according to these rules (array with [palm, small tree, tall tree], and place them as a function of height ranges as shown in the figure below).
Object ideas
- Trees
- Bushes
- Rocks
- Buildings
Useful functions and variables
  // Spawns an object at coordinates (x, z)
  void spawnObject(float x, float z);

  // Returns the interpolated height of the terrain
  float terrain.getInterp(float x, float z);
  // Returns the steepness of the terrain
  float terrain.getSteepness(float x, float z);

  // Return the number of objects instantiated
  int terrain.getObjectCount();
  // Return the location of an object
  Vector3 terrain.getObjectLoc(int index);
  // ADVANCED - Return an instantiated object
  // See Unity manual of TreeInstance for more details
  TreeInstance terrain.getObject(int index);
Code Snippet 5: Useful functions
  // Object to instantiate by default
  GameObject terrain.object_prefab;
  // Min and max size of the instantiated objects
  float terrain.min_scale;
  float terrain.max_scale;
Code Snippet 6: Useful variables
SESSION 03 - Character Animation
Getting started
In this session, you will learn about some important concepts such as Inverse Kinematics, and learn about how to use this technique in order to fully animate one character using procedural methods.
Many animation techniques exist: Virtual characters are often animated using direct kinematics - animation clips, described by keyframes for each bone of character, that are normally played in a state machine among other clips. However, other many methods exist. Inverse Kinematics are often used to animate limbs in the other way around: Given a particular condition, IK calcutates the position and rotation of the limbs to satisfy such requirement. It is used very often as a second-layer for direct kinematic animations, for example, to place the feet of the characters correctly to the irregular ground, or to move the arm when the character takes a mug from a table.
However, you can use IK to animate whole characters as well. Procedural animations define an equation or any other parametrized system which must be followed by the animation, instead of following individual keyframes in the kinematic clips. A ball that falls due to gravity, is just another procedural animation - in this case, the ball follows a physics equation. This techniques are normally denominated as physically-based animations.
In this session, we will learn to convert this…
…to this…
All the necessary files will be in the folder 03 - Character Animation. Let’s start!
Fast IK Demonstration
First, let’s go to 03 - Character Animation > 00 - IK Demonstration. In the scene, you will learn how to build a simple Fast IK algorithm. The script FabricIK.cs contains several code snippets that you will need to complete. All the information that you need to understand the code is already included as comments along the script.
This IK technique is called Fabric IK. A forward and backward pass are used to place an end-effector on a target, while a pole is used to define one of the multiple solutions that one target may contain.
Quadruped with full IK
Now, we can use this knowledge to animate our quadruped:
In the hierarchy, you will find the character in Controllable Characters > Quadruped - (Procedural). It contains the hierarchy of bones, with root at Hips and the family of objects to apply IK inside IK.
All the necessary files are in 03 - Character Animation > 01 - Quadruped with full IK.
FabricIKQuadruped.cs: This script is in charge of implementing IK for each leg of the quadruped, given a target and a pole, exactly as before. It can be found for each leg inside IK in the character hierarchy. Once you have completedFastIK.csin the previous exercise, just copy-paste the code snippets to this one. The funtionality is the same. If it is correctly implemented, try moving the targets (red spheres) and the poles (yellow spheres) to see if it works!FootStepper.cs: This file will describe the behavior of the leg. IK only says how the leg should be placed given a particular target. But when (and how) do we move the leg? Here it comes the procedural function that the legs will follow. By moving the target, in the correct moment and in a particular way, the character will be able to adapts its feet and legs given a particular motion (which is introduced in the next script).QuadrupedProceduralMotion.cs: Once we have the legs implemented using the previous two files, all that is left is moving the character in our scene! And it will be pretty simple. Since the animation is carried out completely by IK, the only thing we need to do is to move our character like if it would be a single “floating object” though the scene - IK will do the rest. For this script, the quadruped will follow a goal, will track his head to always look at it and adapt is body (and therefore, its legs) when there is a differente in height and slope on the terrain.
At the beginning, moving the goal will make the character to follow it without any animation, floating around and going inside the terrain when it gets higher. Your task is to make this character fully responsive when moving the goal. Again, these scripts contain code snippets that you will need to complete. All the information that you need to understand the code is already included as comments along the scripts.
Once you have it, think about particular applications. Characters that follow autonomously a piece of food, or animals that run away from “anti-goals” such as predators. Could we even use some learning-based approach to teach them to follow certain assets? There are many options! We will see more in the next session.
Bonus: Controllable character with FK and IK
If you have time, you can try to set a character controllable by Forward Kinematics, and using IK just to adapt its feet on the ground. This character is already included in the hierarchy, Controllable Characters > Human - (Controller + IK). In the Game window, you can change the display to Display 2 to set a third-person view. You can control the humanoid using the keyboard arrows or WASD keys.
Inside 03 - Character Animation > 02 - Biped Controller with IK you will find the script PlayerControllerIKFeetPlacementTask.cs. All the information about this task can be found in the repo in a separated document, under the Docs folder.
SESSION 04 - Crowds and Evolution
Getting started
During this session, you will be given a basic setup containing simple creatures with eyes, a brain, and steering capabilities, as well as a primitive evolution method. With these, the creatures are able to gradually develop from generation to generation in order to learn how to efficiently reach their food. Your goal is to change parts of this base to extend it to your liking. Ideas of such extensions will be given below.
In order to activate the module of this session, select the terrain and activate the checkbox next to the Genetic Algo component. When you launch the project, you should see capsules (representing animals) appearing and moving on the terrain. Their color changes from white to black as their hunger increases, and they die after some time if they do not manage to reach food in time. After letting the simulation run for a few generations, you should see the animal counter drastically increase, when some animals become smart enough to efficiently get their food.
Animals
The animals created in this session are basic creatures, made of three main components:
- Receptors, that allow the animal to gather information about its environment. In the base example, the creatures are equipped with basic eyes that tells them the distance to the nearest food source in a specific direction, if any. This is implemented in the
Animal.UpdateVision()function, from the file04 - Crowds and Evolution/Animal.cs. - Actuators, that gives the animal the ability to make actions and interact with the environment. Here, the animals automatically and continuously move forward at a constant speed, but have an actuator to rotate their body. This actuator is handled at the end of the function
Animal.Update(). - A brain to link the receptors to the actuators, giving the animals a way to make decisions on what to do based on what they sense. A simple neural network with a configurable network structure is used for this purpose in the base project. For example, the array
[5, 3, 3, 1]passed to its constructor will generate a network with 5 input neurons, 1 output neuron, and 2 hidden layers with 3 neurons each. The details of this class are in the04 - Crowds and Evolution/NeuralNet.csfile.
Evolution
A genetic algorithm is used to teach the animals how to steer towards their food, after multiple generations. This works by allowing the animals that reach food to reproduce, thus spreading their genes (parameters of their brain), with minor random modifications to allow evolution. The animals with inefficient genes are unable to reach food before dying, thus encouraging only the spread and evolution of successful animals. This is implemented in the file 04 - Crowds and Evolution/GeneticAlgo.cs .
Resources
The animals simulated here are designed to be herbivores, that eat by passing over a source of food. Grass grows randomly over the terrain, creating a competition between the different animals to access the resources.
Meta Extensions
- If you have particular terrain zones (water, mountains, etc.), tweak grass spawn parameters to make it appear differently based on the zone. This should create clusters of animals grouping in certain places over time.
- Better visualisation (receptors, actuators, energy, brain, fitness, etc.). Use methods such as
Debug.DrawRay()to show how vision works, or lines to connect the animal to the targeted food. - Analysis of effects/impact of different changes or abilities (e.g., which is the impact of having a worse vision?). Find optimal configuration for convergence.
- Actual animal or creature models (import or create). You can try to use the procedural animal created in the previous version.
- Brain export/import functions to save state to disk and restore at any point later.
- Neural Net vs. RL: Does it make any difference? Food Collector for ml-agents
Medium Extensions
- Receptors: other senses (e.g., smell), more refined eyes, self-info (e.g., am I hungry?).
- Actuators: other ways to move, actions (e.g., actuator to eat food).
- Brain: more complex networks, different architectures.
- Genetic algorithm (improve population control; keep track of best animals to instantiate; other mutation types, animal reproduction).
Complex Extensions
- Prey-predator model, where the predators try to catch preys to eat, and the preys try to evade them (and eat grass at the same time?).
- Enable physical creature evolution (transmit actuators, receptors, besides the brain to the offspring). Dynamically generate an appearance based on capabilities.
Useful functions
  // Update the genetic algo simulation
  void GeneticAlgo.step();
  void GeneticAlgo.updateResources();

  // Animal main update function
  void Animal.Update();
  // Animal receptors computations
  void Animal.updateVision();

  // Brain class of the animals
  class NeuralNet;
  // Mutate a brain to simulate evolution
  void NeuralNet.mutate(...);
Code Snippet 7: Useful functions
Interesting Links
The senior students of this course did some great projects. You can find videos of some of them at this link. May they inspire you!
Besides, other intersting links that can be useful: